Configure a development build in cloud
Edit page
Learn how to configure a development build for a project using EAS Build.
In this chapter, we'll set up and configure a development build with EAS for our example app.
Learn how to install expo-dev-client, configure build profiles in eas.json, and create your first development build with EAS Build.
Understanding development builds
Let's start by learning about what are development builds and why we need them.
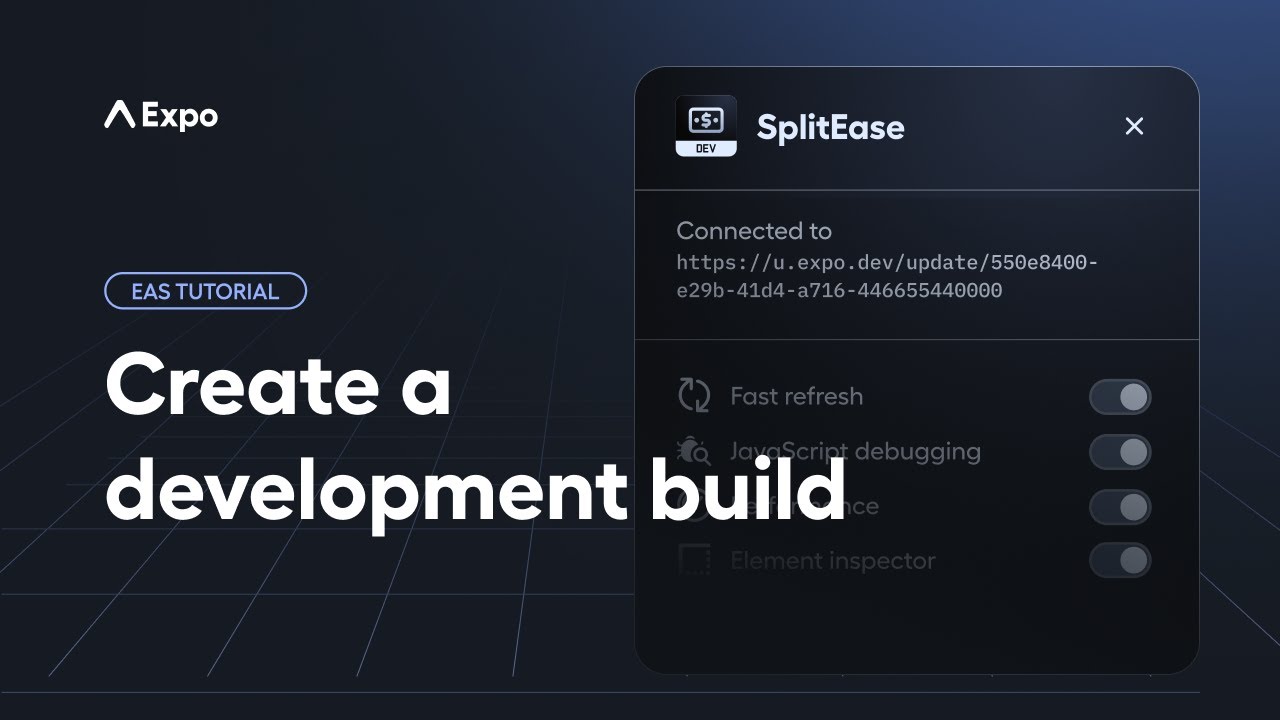
A development build is a debug version of our project. It is optimized for quick iterations when creating an app. It contains the expo-dev-client library, which offers a robust and complete development environment. This setup allows us to integrate any native library or change code inside the native directories as required.
Key highlights
Note: If you are familiar with Expo Go, think of a development build as a customizable version of Expo Go that is unique to the requirements of a project.
| Feature | Development Builds | Expo Go |
|---|---|---|
| Development phase | Offers web-like iteration speed for mobile app development. | Allows for quick iteration and testing of Expo SDK projects using the client app. |
| Collaboration | Facilitates team testing with shared native runtime. | Easy project sharing via QR codes on a device. |
| Third-party libraries support | Full support for any third-party library, including those that require custom native code. | Limited to libraries within the Expo SDK, not suitable for custom native dependencies. |
| Customization | Extensive customization with config plugins and direct access to native code. | Limited customization with a focus on Expo SDK capabilities without direct native code modification. |
| Intended use | Ideal for full-fledged app development aimed at store deployment, offering a complete development environment and tools. | Ideal for learning, prototyping, and experimenting. Not recommended for production apps. |
1
Install expo-dev-client library
To initialize our project for a development build, let's cd inside our project directory and run the following command to install the library:
- npx expo install expo-dev-clientStart the development server
Run the npx expo start to start the development server:
- npx expo startThis command starts the metro bundler. In the terminal window, we see the QR code followed by the Metro waiting on... and a manifest URL:
Let's notice the changes installing the expo-dev-client library:
- The manifest URL contains
expo-development-clientalong with the app scheme - The development server now operates for a development build (instead of Expo Go).
Since we do not have a development build installed on one of our devices or an emulator/simulator, we can't run our project yet.
2
Initialize a development build
Install EAS CLI
We need to install the EAS command-line interface (CLI) tool as a global dependency on our local machine. Run the following command:
- npm install --global eas-cliLog in or sign up for an Expo account
If you have an Expo account and are signed in using Expo CLI, skip this step. If you don't have an Expo account, sign up here and proceed with the login command described below.
To log in, run the following command:
- eas loginThis command asks for our Expo account email or username and password to complete the login.
Initialize and link the project to EAS
For any new project, the first step is to initialize and link it to the EAS servers. Run the following command:
- eas initOn running, this command:
- Requests verification of the account owner by entering our Expo account credentials and asks if we want to create a new EAS project:
# Output after running eas init✔ Which account should own this project? > your-username✔ Would you like to create a project for @your-username/sticker-smash? … yes✔ Created @your-username/sticker-smash✔ Project successfully linked (ID: XXXX-XX-XX-XXXX) (modified app.json)- Creates EAS project and provides a link to that project which we can open in the EAS dashboard:
- Generates a unique
projectIdand links this EAS project to the example app on our development machine. - Modifies app.json to include
extra.eas.projectIdand updates its value with the unique ID created.
3
Configure project for EAS Build
To set up our project for EAS Build, run the following command:
- eas build:configureOn running, this command:
- Prompts to select a platform: Android, iOS, or All. Since we are creating Android and iOS apps, let's select All.
- Creates eas.json in the root of our project's directory with the following configuration:
{
  "cli": {
    "version": ">= 16.18.0",
    "appVersionSource": "remote"
  },
  "build": {
    "development": {
      "developmentClient": true,
      "distribution": "internal"
    },
    "preview": {
      "distribution": "internal"
    },
    "production": {
      "autoIncrement": true
    }
  },
  "submit": {
    "production": {}
  }
}
This is the default configuration for eas.json in a new project. It does two things:
- Defines the current EAS CLI version.
- Adds three build profiles:
development,preview, andproduction.
Explore development profile further
eas.json is a collection of different build profiles. Each profile is tailored with distinct configurations to produce specific build types. These profiles can also include platform-specific settings for Android or iOS.
Currently, our focus is on the development profile, which includes the following configuration:
developmentClient: Enabled (true) for creating a debug build. It loads the app using theexpo-dev-clientlibrary, which provides development tools and generates a build artifact for device or emulator/simulator installation and allows using the app for local development as it supports updating the JavaScript on the fly.distribution: Configured asinternalto indicate that we want to share the build internally (instead of uploading it on app stores).
Note: Builds offer extensive customization options, including platform-specific settings and the ability to extend configurations across different build profiles. Learn more about customizing build profiles.
Summary
Chapter 1: Configure development build in cloud
We successfully used the EAS CLI to initialize, and configure our project, link it to EAS servers, and prepare a development build.
In the next chapter, let's create a development build for Android, install it on a device and an emulator, and get it running with the development server.