Develop an app with Expo
An overview of the development process of building an Expo app to help build a mental model of the core development loop.
If you're new to Expo and React Native or you've been around the ecosystem for a while, this document will be useful to help you to better understand the development process of building an Expo app. It will help you build a mental model of the core development loop and how Expo tools fit into it.
Key concepts
The following concepts are valuable to understand, and we recommend referring back to these definitions as you read through the rest of this guide and also as you use Expo tools.
What is an "Expo app"?
This is a shorthand term we use for describing a React Native app that uses Expo tools. An "Expo app" can use a single package from the Expo SDK, or Expo Router, or Expo CLI, or Continuous Native Generation, a combination of them, or any other Expo tools.
We say "Expo app" because React Native app that uses Expo tools is incredibly inconvenient to frequently type and speak out loud.
Is the development process different for an "Expo app" and a "React Native app that does not use Expo tools"?
Expo provides a variety of tools and services that can be adopted independently, so the answer depends on which tools you choose to use. For most of what Expo provides, there is no React Native tooling provided by Meta that is comparable.
What is the difference between "Expo" and "Expo Application Services (EAS)"?
Expo is an open-source project that gives developers powerful tools to assist in building and maintaining React Native apps at any scale. For example, Expo CLI, Expo Router, and Expo SDK packages. All Expo open-source tools are entirely free to use and carry the MIT license.
Expo Application Services (EAS) is a suite of hosted services that you can use with Expo and React Native projects to:
- Build, submit, and update your app
- Set up automation around all of these processes
- Collaborate with your team
EAS solves a set of problems that require physical resources, such as application servers and CDNs for serving over-the-air updates and physical servers for running builds. EAS has a generous free plan that will work for many student and hobby projects.
You don't have to use GitHub to use git, but it certainly helps for many cases. The same goes for EAS and Expo.
Do I have to use EAS if I use Expo open source tools?
Nope! Your Expo project is just a React Native app, which is just a native app. You can use Fastlane or any native build, update, and more, tools you like.
Most EAS services also allow you to run them on your own infrastructure, and we provide instructions for how you can accomplish this. For example, self-hosting updates (rather than using EAS Update), or running builds locally or on your own CI (rather than using our EAS Build worker fleet).
For most teams, it makes sense to use EAS rather than spending the engineering time and resources on acquiring, setting up, and maintaining the services on other infrastructure. Additionally, EAS provides deep integration between services, such as the deployments page for monitoring app version adoption, assigning updates to specific builds, and rolling those updates out incrementally — which ties back into monitoring with EAS Insights.
Can I use EAS if I'm not using any Expo open source tools?
Yes! We think EAS is a great fit for any React Native project.
Expo Go: an optional tool for learning, experimenting, and prototyping
There's no faster way to spin up a React Native project and run it on your device or emulator than Expo Go, especially when combined with Snack.
However, Expo Go and Snack are not intended for building production apps. They are great when you're getting started on a project or for prototypes. If you plan on deploying your app to the store, then development builds will provide a more flexible, reliable, and complete development environment. This guide does not go into any detail about Expo Go, and this is the only section that mentions it.
Development builds
A development build is a debug build of your app that contains expo-dev-client library. It helps you iterate as quickly as possible and provides a more flexible, reliable, and complete development environment than Expo Go. You can install any native library and configure or apply changes to a native project using app config or by creating a config plugin. You can create a development build locally or use EAS Build to create a build in the cloud.
Android and iOS native projects
React Native apps for mobile platforms are made of two interconnected parts:
1. The app JavaScript
This contains your React components and most, if not all, of your application logic. It has more or less the same role as the app JavaScript on React websites.
2. The native projects
Android and Xcode projects that bundle the JavaScript app, serve as the launchpad for the JavaScript app on each platform. They also handle the rendering of native components and provide the means to access platform-specific functionalities and integrate with any installed native libraries. App configuration, such as the name (as it appears on the home screen), icon, required permissions, associated domains, supported orientations, and so on, is configured in the native project.
Like any mobile app, the application that is distributed to users is created by compiling ("building") the Android Studio or Xcode project.
When you initialize a new app with npx create-expo-app, you will not see any android or ios directories. You can generate the native projects by running npx expo prebuild, which will initialize the native projects and then apply the project Expo app config (app.json/app.config.js) to them.
If you use a cloud-based development workflow, you may never need to run prebuild or install Android Studio or Xcode on your own machine (although you may find this useful). This is explained below in the Local and cloud-based development workflows.
Why aren't the native projects created by default when you initialize a project with create-expo-app?
The default behavior encourages the use of Continuous Native Generation (CNG) to generate the native projects when needed, which can make upgrades and project maintenance significantly easier. The following three commands result in more or less the same project:
- npx create-expo-app MyApp && cd MyApp && npx expo prebuild- npx create-expo-app --template bare-minimum- npx react-native init MyApp && cd MyApp && npx install-expo-modulesContinuous Native Generation (CNG)
Continuous Native Generation (CNG) is a process for building an Expo app where your native projects are generated on-demand from your app.json and package.json, similar to how your node_modules are generated from your package.json.
You can add the native project directories (android and ios) to your .gitignore and/or delete the project at any time, then re-generate them from the Expo app config with npx expo prebuild whenever required. You might never even run prebuild on your own development machine if you use a cloud-based development workflow.
Using CNG can make upgrading to new versions of React Native much easier. It can simplify project maintenance and facilitate setting up complex features such as App Clips, share extensions, and push notifications. This is all made possible with config plugins. Learn more about CNG.
What if I want to edit the native project configuration in Android Studio or Xcode rather than generating the projects with prebuild?
CNG has proven to be helpful to many teams. However, it may not be the best fit for your project and this is a perfectly reasonable way to use Expo tools in many cases.
You can run npx expo prebuild in the project and then make changes directly to the android and ios directories, instead of using Expo app config. If you decide to do this, then keep in mind that you won't be able to re-generate your projects using prebuild any longer — running prebuild after making native changes directly will overwrite all of those modifications.
Note that you can use config plugins to modify the native project configuration without having to modify the native projects directly, and if you decide to move back to CNG at some point.
How do I know when I need to run prebuild again?
If you add a new native dependency to your project or change the project configuration in Expo app config (app.json/app.config.js), you can run npx expo prebuild --clean to re-generate the native project directories.
See Determining third-party library compatibility for more information on how to determine if a new dependency requires native code changes.
Cloud-based and local development workflows
Whether you choose cloud-based or local doesn't significantly alter your development loop. It's about how you produce and distribute your app binaries that your JavaScript code runs against. Choosing a cloud-based or local development is a choice you can make each time you run a new native build.
Compiling your app in the cloud with EAS Build is as easy as running a single command, no need to install Android Studio or Xcode. Cloud builds make it easier to share your app with other teammates or stakeholders, among other benefits.
To compile your app locally, you will need to install Android Studio and Xcode on your machine, and then you can either run the build from those tools or use npx expo run:[android|ios]. This is most useful when you want to debug your app on a physical device or emulator/simulator using the native debugging tools.
Learn more about cloud-based workflows with EAS Build and local development.
Initialize and run a project
The easiest way to create a new project is with create-expo-app. After creating your project, you can immediately launch it directly in Expo Go on your physical device or in an emulator/simulator if you want to experiment or build a quick prototype.
In most cases, you will create and use a development build of your project. You will install the expo-dev-client library. Development builds can be created with EAS Build or locally on your machine:
Learn how to a create development build for your project using EAS.
Learn how to compile your app locally using your own machine, Android Studio and Xcode.
The core development loop
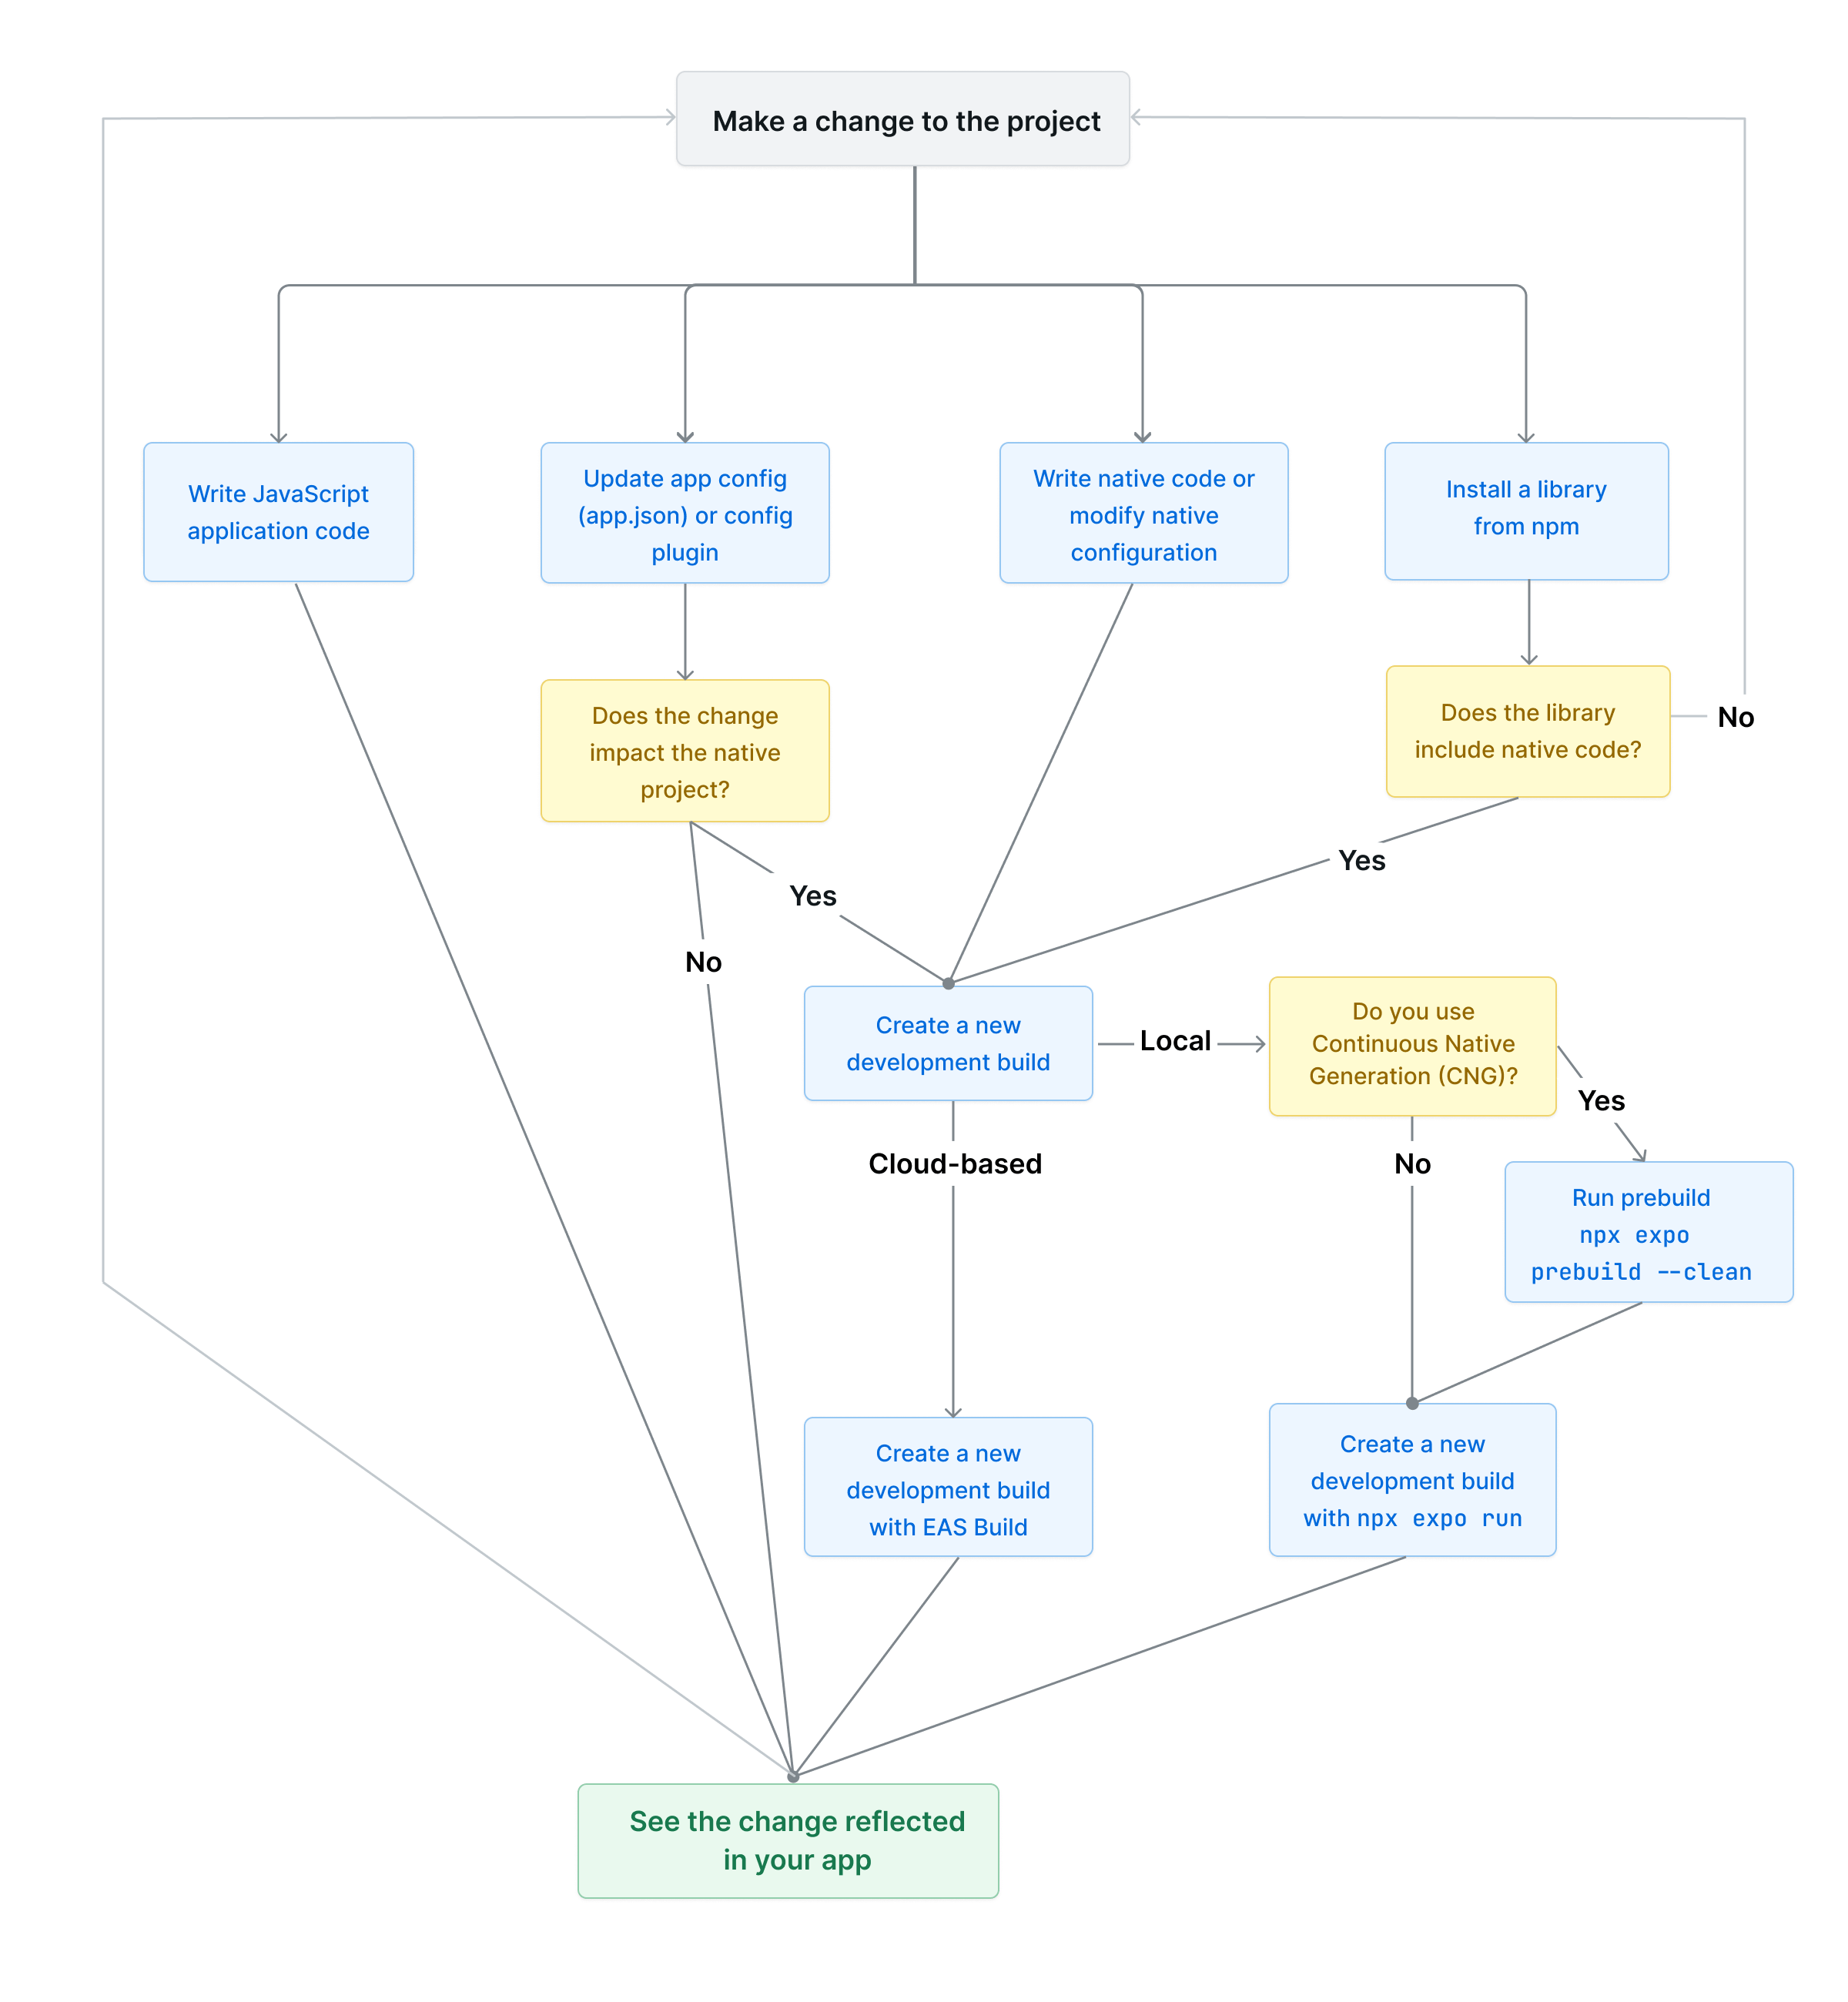
The core development loop described in the diagram above is a cycle of four main activities that you typically go through when developing an app.
-
Write and run JavaScript code: This involves creating components, writing business logic, or installing libraries from npm that don't require native code changes. The changes you make here are reflected in your app without needing any interaction with the native side of your app.
-
Update app configuration: This involves modifying your app's configuration using the app config file (app.json or app.config.js). It includes updating your app's name, icon, splash screen, and other properties. These changes don't all affect the native project directly. However, if you make changes that affect the native projects, you can use the app config to modify the native project configuration or create or use a config plugin. See app config reference for a complete list of properties available in the app config file.
-
Write native code or modify native project configuration: This includes writing native code directly or modifying native code configuration. You either need access to the native code project directories to make these changes, or you can write native code with a local Expo Module.
-
Install a library that requires native code modifications: This includes that a library requires making changes to the native code project configuration. Either the library provides a config plugin or steps to take to update the app config. Like the previous activity, this also requires you to create a development build.
When creating a development build, you have two options. You can create a cloud-based build using EAS Build or do it locally. If you choose to do it locally, you can use CNG and then npx expo prebuild --clean, or you can create a development build using npx expo run android|ios or Android Studio and Xcode.
Note: When creating a development build locally, the
npx expo runcommands will generate native directories before building your app. If you modify your project's configuration or native code after the first build, you will have to rebuild your project. Runningnpx expo prebuildagain layers the changes on the top of existing files. It may also produce different results after the build. To avoid this, add native directories to the project's .gitignore and usenpx expo prebuild --cleancommand.
During your app's development loop can also install different variants (development, preview or production) of your app on the same device.
Another key part of the development loop is debugging. See Debugging runtime issues for more information about debugging your app and learn about different debugging tools available.
Share app with testers
The next step to developing an app is to share your app with your team, with beta testers, or run it on multiple test devices. A traditional approach is to upload your app's binary to the Google Play Beta (Android) or TestFlight (iOS). This can be a time-consuming effort and is limited to only one active build at a time (for example, in the case of TestFlight).
If you are using EAS Build, we recommend going through Internal distribution to learn more about sharing your app for testing.
If you compile your app locally, you can create release builds locally.
Release app to stores
To release your app on the app stores, you can use EAS Submit. For more information on using EAS Submit, see Submit to Google Play Store and Submit to Apple App Store.
To create a release build locally, see release builds locally and then go through the app stores guide to submit your app.
Monitor app in production
Two ways to monitor your production app are crash reports and analytics. Crash reports help you learn about exceptions or errors that your users run into while using your app. You can use Sentry or BugSnag to enable crash reports.
Analytics allows you to track how users interact with your app. See analytics overview to learn more about the services available in the Expo and React Native ecosystem.
Update the app
The expo-updates library allows you to programmatically make instant updates to your app's JavaScript available to your production app.
You can use EAS Update which provides first-class support for instant updates in a React Native app. It serves updates from the edge of a global CDN and uses modern networking protocols such as HTTP/3 for clients that support them. It is also tailored for developers who use EAS Build. You can also use it for builds you have created locally.