Alternative deployment patterns
Edit page
Learn about different deployment patterns for your project when using EAS Update.
Once we've created features and fixed bugs in our app, we want to deliver those features and bug fixes to our users as quickly and safely as we can. Often "safe" and "fast" are opposing forces when delivering code to our users. We could push our code directly to production, which would be fast yet less safe since we never tested our code. On the other hand, we could make test builds, share them with a QA team, and release them periodically, which would be safer but slower to deliver changes to our users.
Depending on your project, you'll have some tolerance for how "fast" and how "safe" you'll need to be when delivering updates to your users.
There are three parts to consider when designing the EAS Update deployment process:
- Creating builds
- (a) We can create builds for production use only.
- (b) We can create builds for production use and separate builds for pre-production change testing.
- Testing changes
- (a) We can test changes with TestFlight and Play Store Internal Track.
- (b) We can test changes with an internal distribution build.
- (c) We can test changes with Expo Go or a development build.
- Publishing updates
- (a) We can publish updates to a single branch.
- (b) We can create update branches that are environment-based, like "production" and "staging".
- (c) We can create update branches that are version-based, like "version-1.0", which enables us to promote updates from one channel to another.
We can mix, match, and tweak the parts above to create a process that is the right balance of release cadence and safety for our team and users.
Another trade-off to consider is the amount of bookkeeping of versions/names/environments we'll have to do throughout the process. The less bookkeeping we have to do will make it easier to follow a consistent process. It'll also make it easier to communicate with our colleagues. If we need fine-grained control, bookkeeping will be required to get the exact process we want.
Below, we've outlined four common patterns on how to deploy a project using EAS Update.
Two-command flow
This flow is the simplest and fastest flow, with the fewest amount of safety checks. It's great for trying out Expo and for smaller projects. Here are the parts of the deployment process above that make up this flow:
Creating builds: (a) Create builds for production use only.
Testing changes: (c) Test changes with Expo Go or a development build.
Publishing updates: (a) Publish to a single branch.
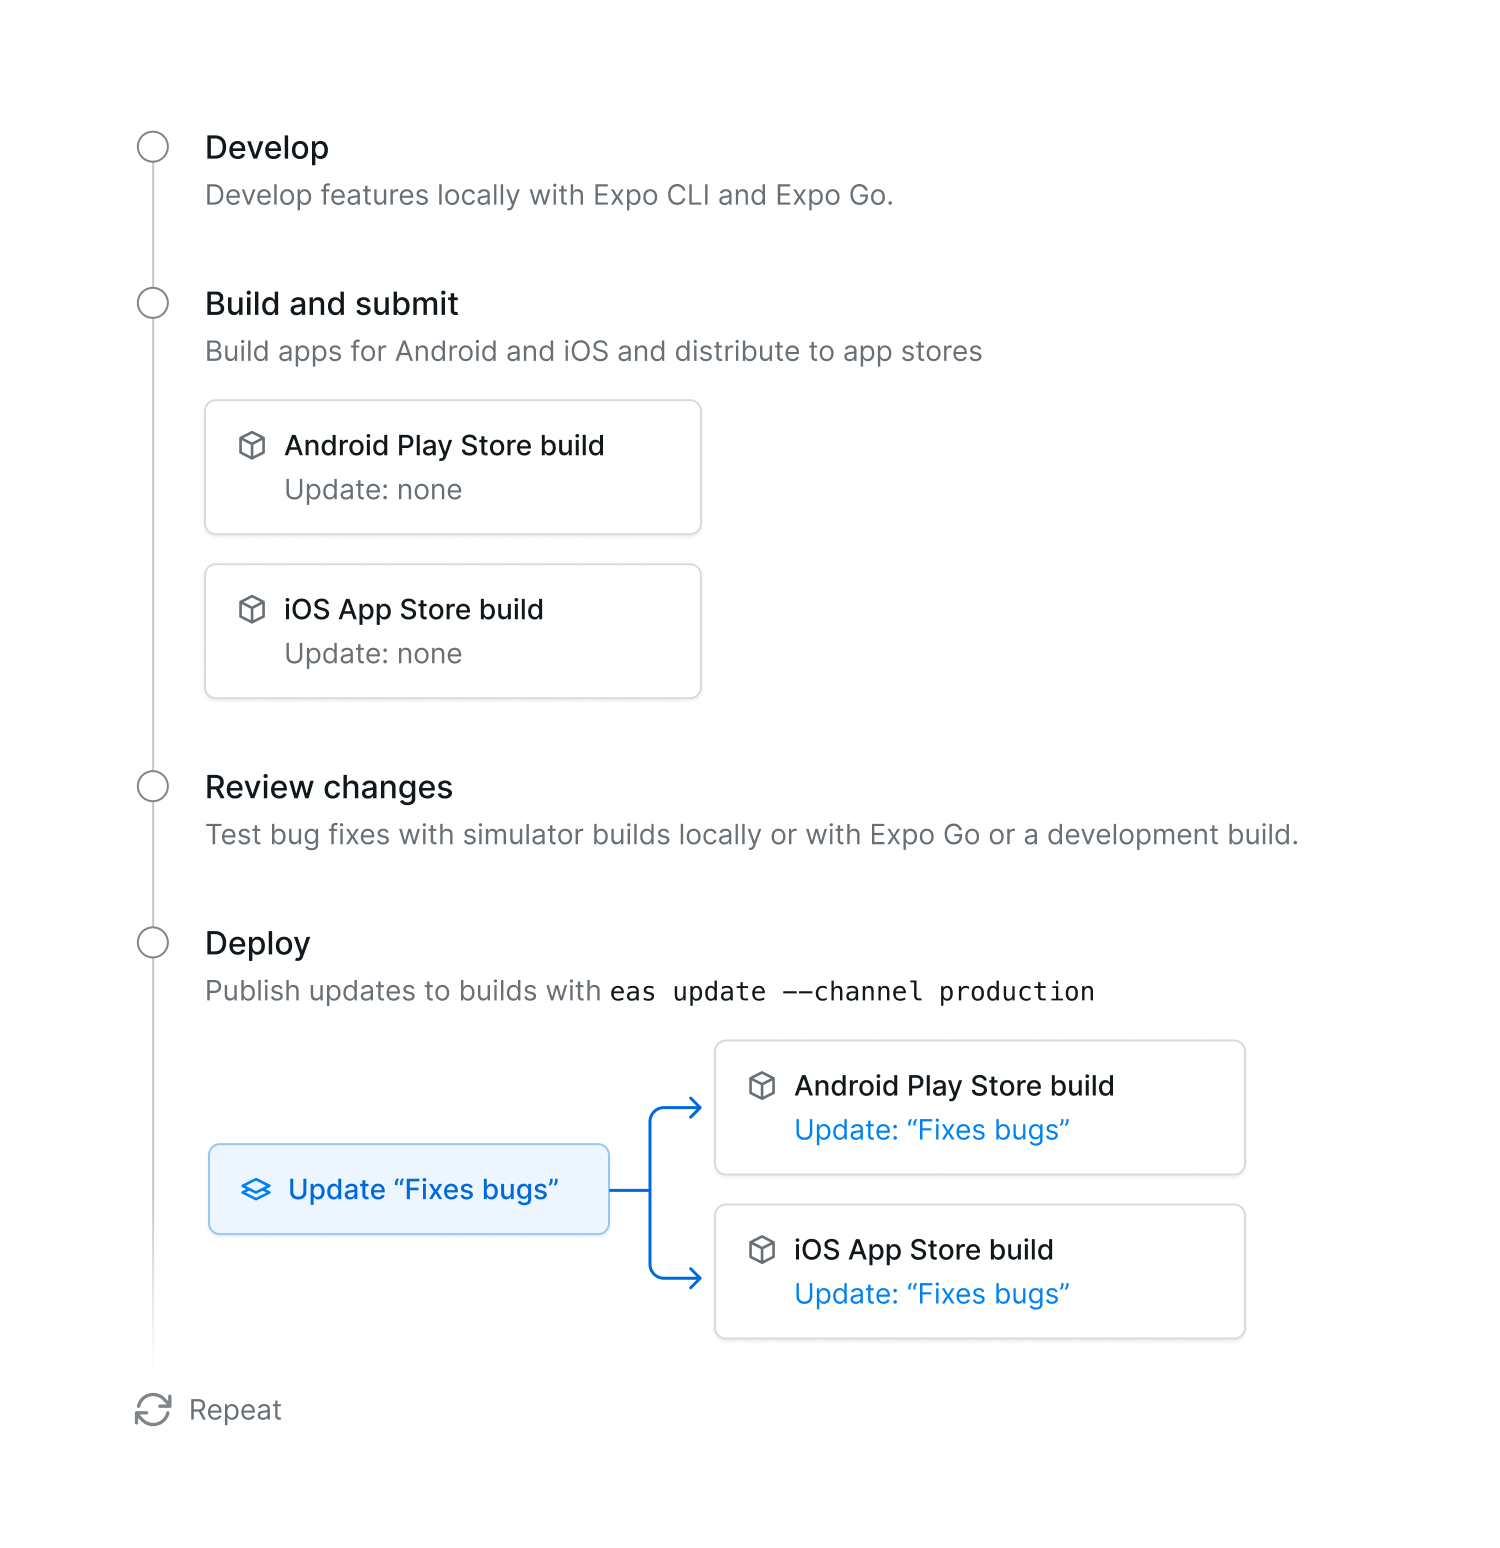
Diagram of flow

Explanation of flow
- Develop a project locally and test changes in a development build or in Expo Go.
- Run
eas buildto create builds, then submit them to app stores. These builds are for public use and should be submitted/reviewed, and released on the app stores. - When we have updates we'd like to deliver, run
eas update --branch productionto deliver updates to our users immediately.
Advantages of this flow
- This flow does not require bookkeeping extra version or environment names, which makes it easy to communicate to others.
- Delivering updates to builds is very fast.
Disadvantages of this flow
- There are no pre-production checks to make sure the code will function as intended. We can test with Expo Go or a development build, but this is less safe than having a dedicated test environment.
Persistent staging flow
This flow is like an un-versioned variant of the "branch promotion flow". We do not track release versions with branches. Instead, we'll have persistent "staging" and "production" branches that we can merge into forever. Here are the parts of the deployment process above that make up this flow:
Creating builds: (b) Create builds for production and separate builds for testing.
Testing changes: (a) Test changes on TestFlight and the Play Store Internal Track and/or (b) Test changes with internal distribution builds.
Publishing updates: (b) Create update branches that are environment-based, like "staging" and "production".
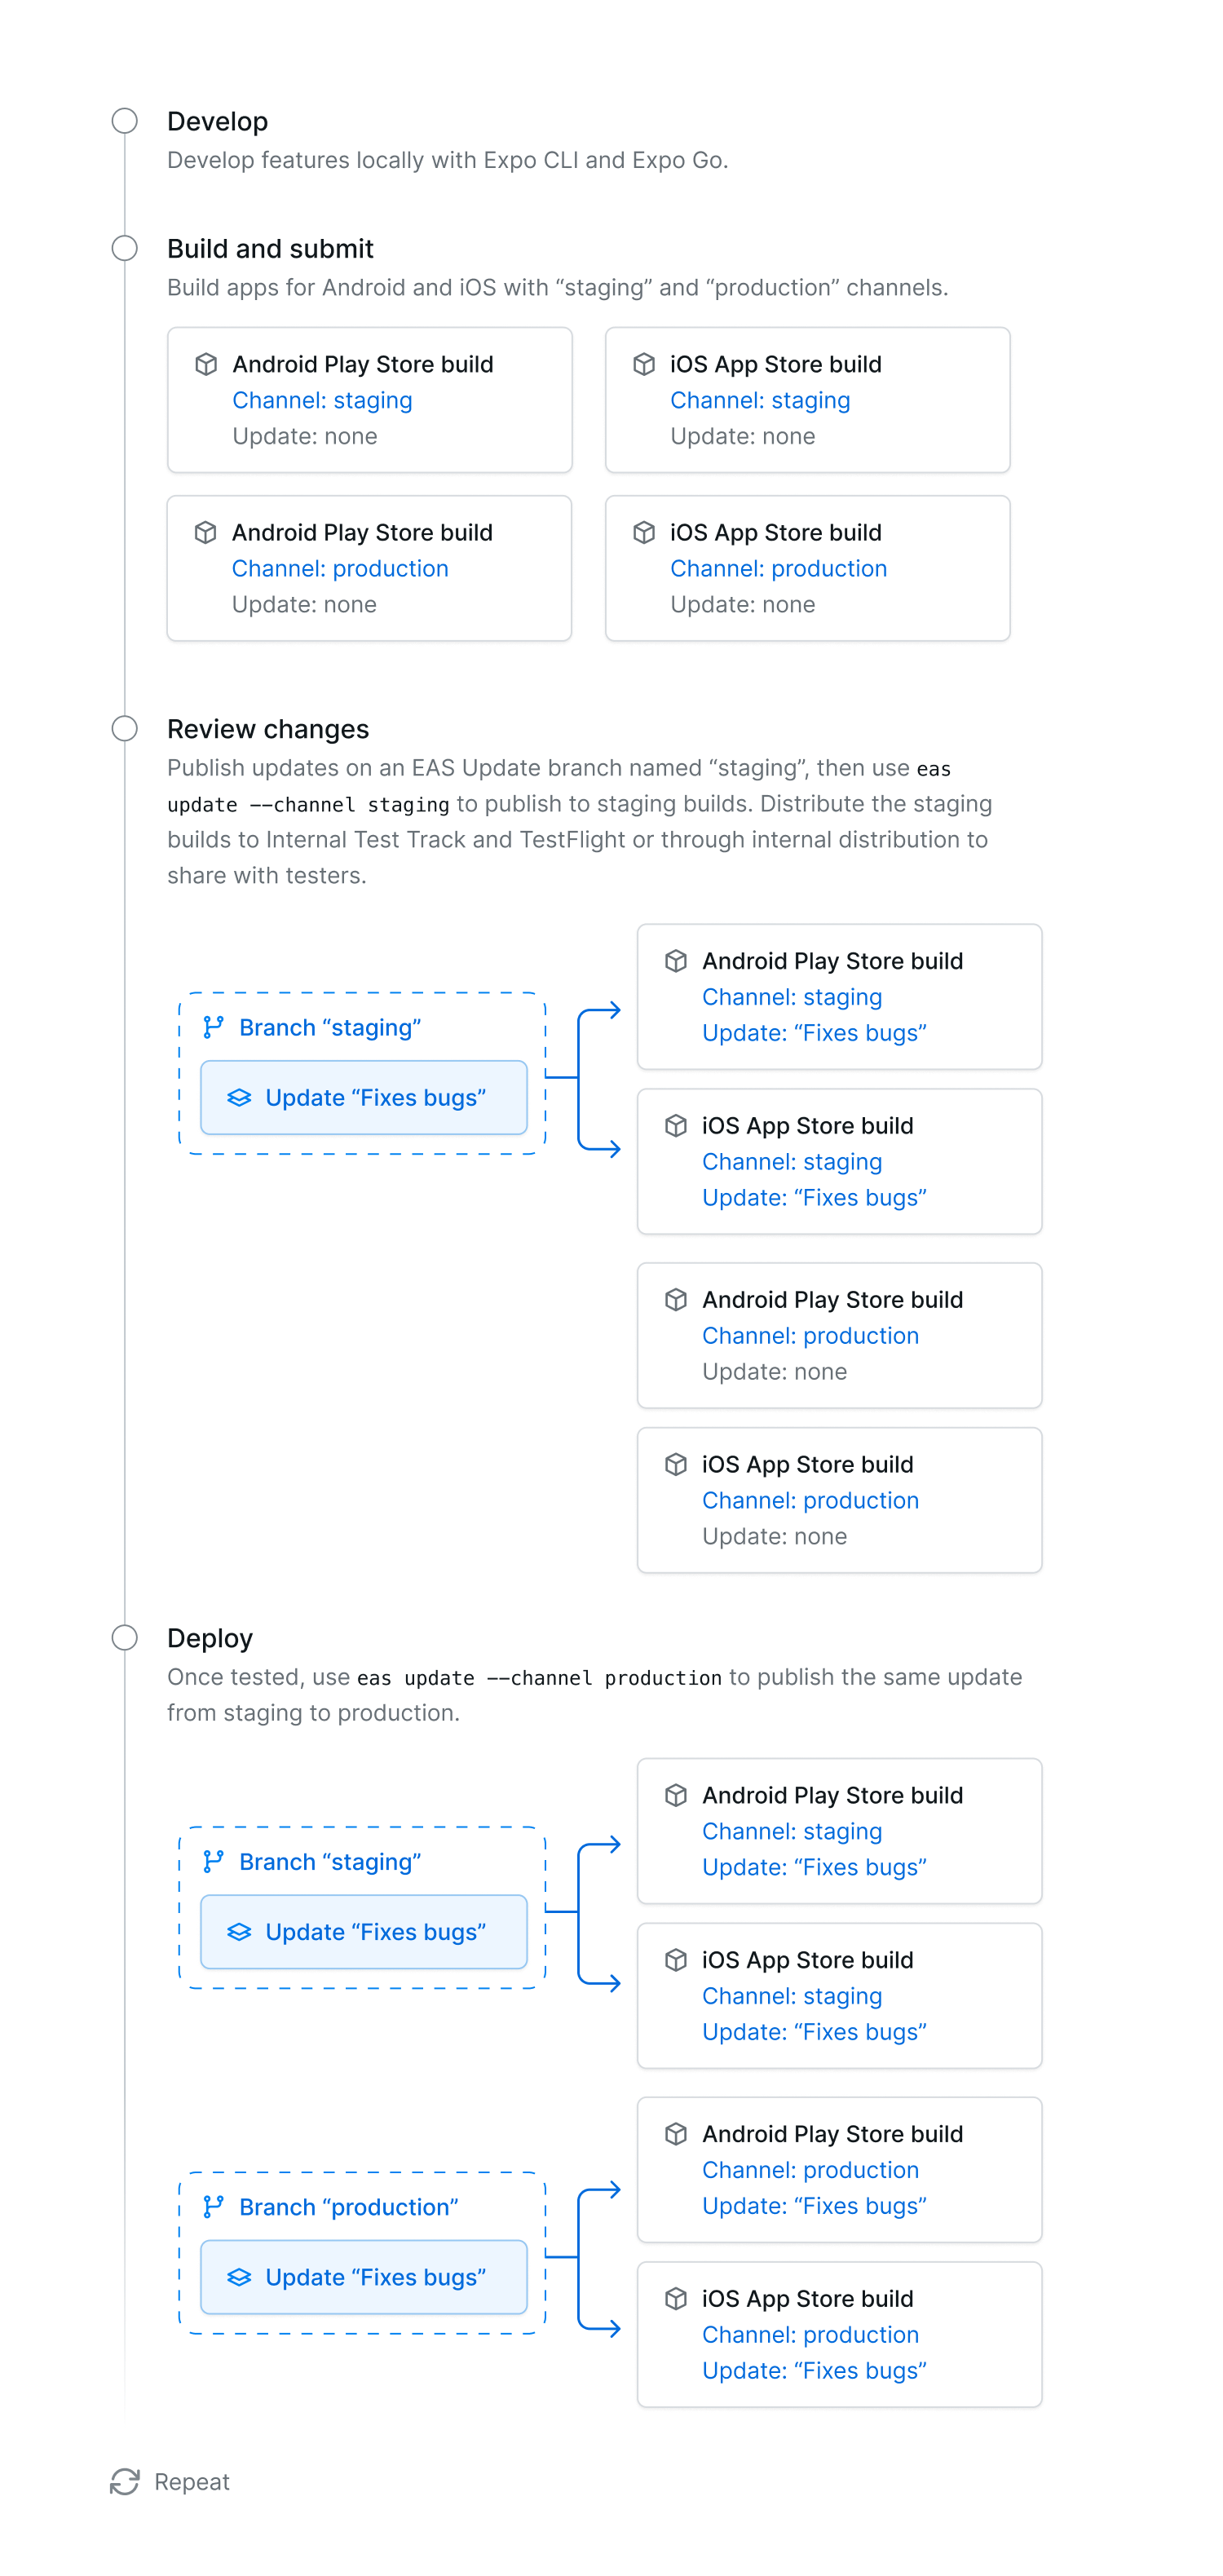
Diagram of flow

Explanation of flow
- Develop a project locally and test changes in Expo Go.
- Create builds with channels named "production", which will eventually get reviewed and become available on app stores. Create another set of builds with channels named "staging", which will be used for testing on TestFlight and the Play Store Internal Track.
- Set up
expo-github-actionto publish updates when merging commits to branches. - Merge changes into a branch named "staging". The GitHub Action will publish an update and make it available on our test builds.
- When ready, merge changes into the "production" branch to publish an update to our production builds.
Advantages of this flow
- This flow allows you to control the pace of deploying to production independent of the pace of development. This adds an extra chance to test your app and avoids your user having to download a new update every time a PR is landed.
- It's easy to communicate to your team, since deploying updates occurs when merging into GitHub branches named "staging" and "production".
Disadvantages of this flow
- Checking out previous versions of your app is slightly more complex, since we'd need to check out an old commit instead of an old branch.
- When merging to "production", the update would be re-built and re-published instead of moved from the builds with channel "staging" to the builds with channel "production".
Platform-specific flow
This flow is for projects that need to build and update their Android and iOS apps separately all the time. It will result in separate commands for delivering updates to the Android and iOS apps. Here are the parts of the deployment process above that make up this flow:
Creating builds: (a) Create builds for production only, or (b) create builds for production and separate builds for testing.
Testing changes: (a) Test changes on TestFlight and the Play Store Internal Track and/or (b) Test changes with internal distribution builds.
Publishing updates: (b) Create update branches that are environment- and platform-based, like "ios-staging", "ios-production", "android-staging", and "android-production".
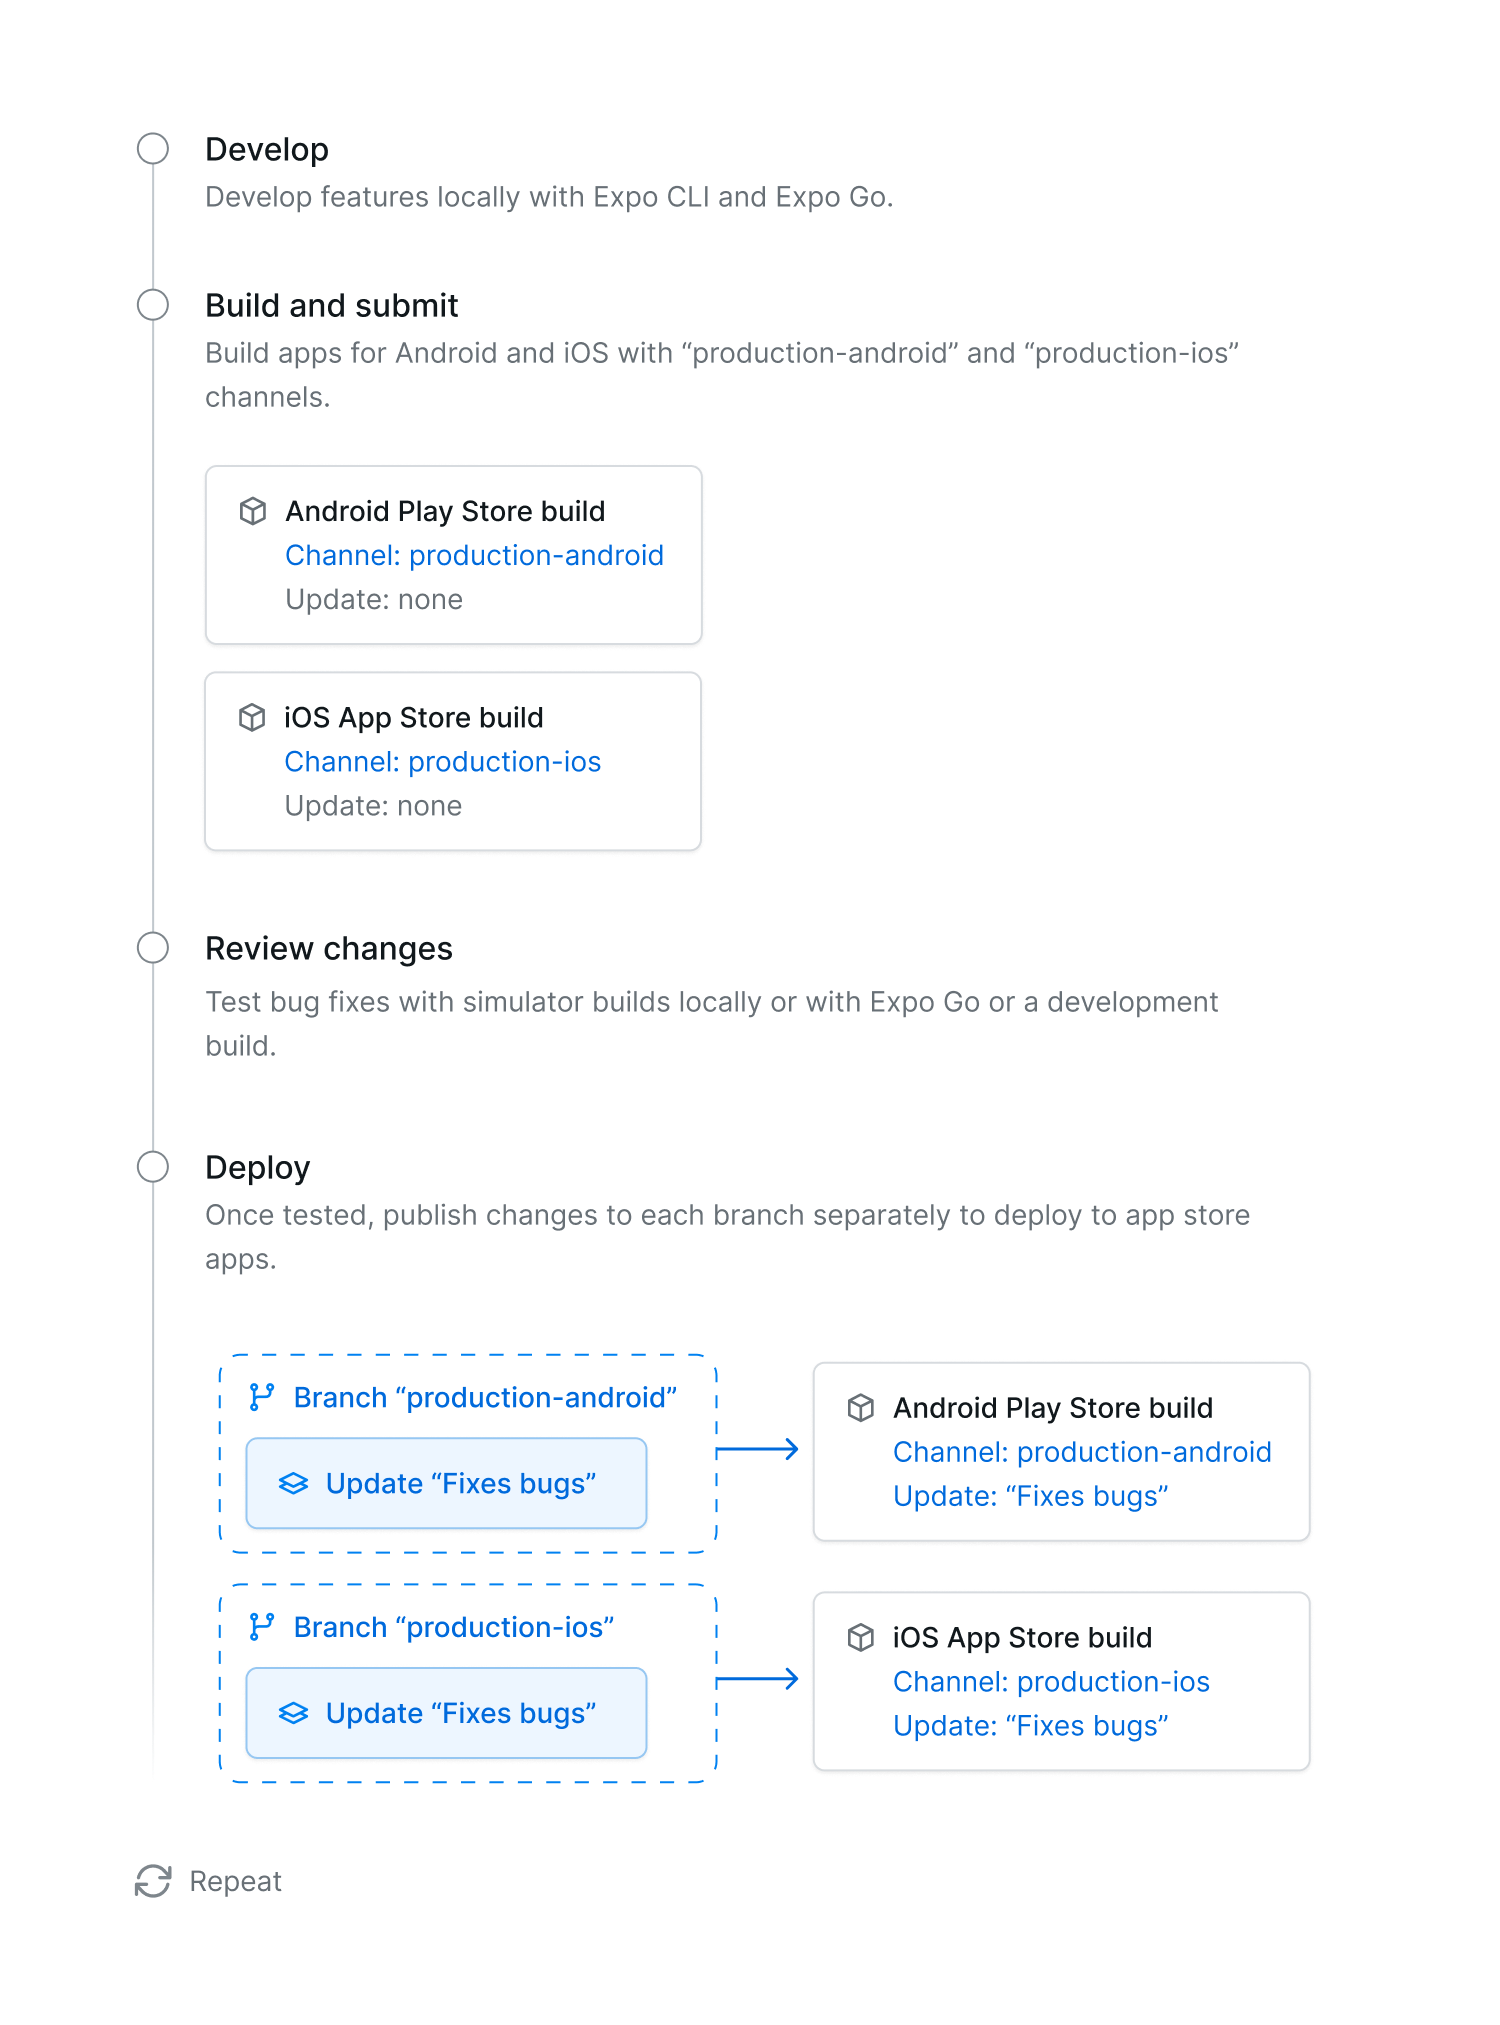
Diagram of flow

Explanation of flow
- Develop a project locally and test changes in Expo Go.
- Create builds with channels named like "ios-staging", "ios-production", "android-staging", and "android-production". Then put the "ios-staging" build on TestFlight and submit the "ios-production" build to the public App Store. Likewise, put the "android-staging" build on the Play Store Internal Track, and submit the "android-production" build to the public Play Store.
- Set up
expo-github-actionto publish updates to the required platforms when merging commits to branches. - Then, merge changes for the iOS app into the branch "ios-staging", then when ready merge changes into the "ios-production" branch. Likewise, merge changes for the Android app into the branch "android-staging" and when ready, into the branch named "android-production".
Advantages of this flow
- This flow gives you full control of which updates go to your Android and iOS builds. Updates will never apply to both platforms.
Disadvantages of this flow
- You'll have to run two commands instead of one to fix changes on both platforms.
Branch promotion flow
This flow is an example of a flow for managing versioned releases.
This flow requires a bit more bookkeeping and does not support automatic runtime version policies ("sdkVersion","appVersion","nativeVersion"and"fingerprint"). You will need to manually specify your runtimes' versions with this flow.
Here are the parts of the deployment process above that make up this flow:
Creating builds: (b) Create builds for production (one per major version) and separate builds for testing.
Testing changes: (a) Test changes on TestFlight and the Play Store Internal Track and/or (b) Test changes with internal distribution builds.
Publishing updates: (c) Create update branches that are version based, like "version-1.0". Branches are dynamically mapped to channels to promote well-tested changes from testing to production.
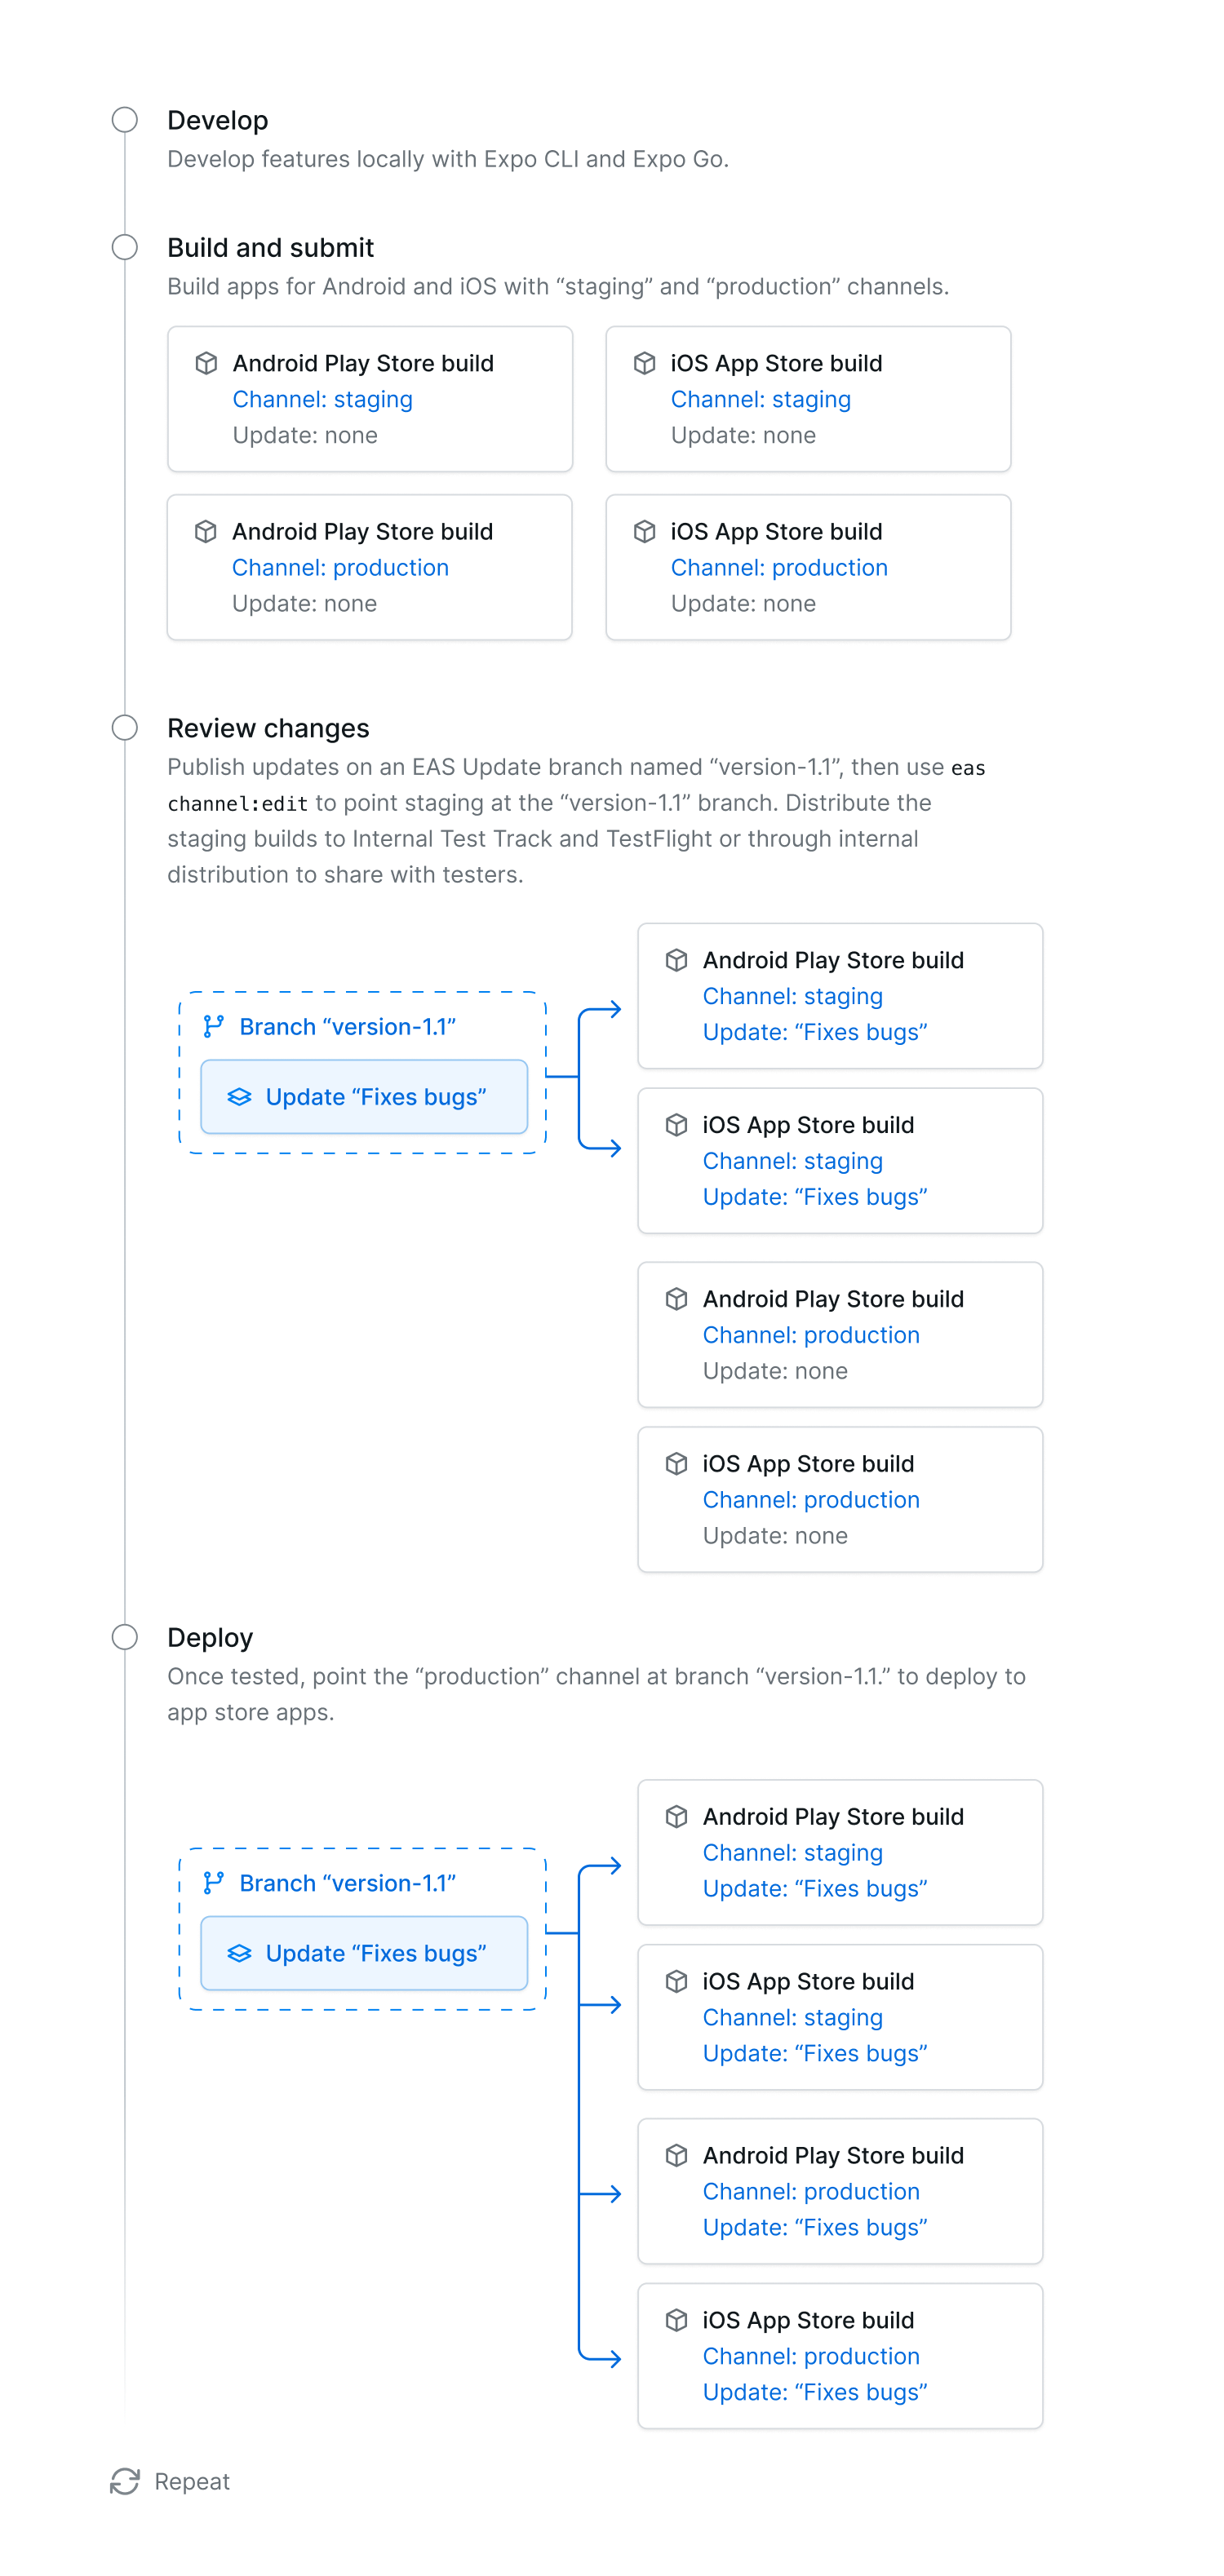
Diagram of flow

Explanation of flow
- Develop a project locally and test changes in Expo Go or a development build.
- Create builds with channels named "production-rtv-1" (indicating a channel with a runtime version "1"), which will eventually get reviewed and become available on app stores. Create another set of builds with channels named "staging", which will be used for testing on TestFlight and the Play Store Internal Track.
- Set up
expo-github-actionto publish updates when merging commits to branches. - Merge changes into a branch named "version-1".
- Use the website or EAS CLI to point the "staging" channel at the EAS Update branch "version-1". Test the update by opening the apps on TestFlight and the Play Store Internal Track.
- When ready, use the website or EAS CLI to point the "production-rtv-1" channel at the EAS Update branch "version-1".
- Then, there are two update scenarios you may encounter:
- A new release does not require a new runtime version:
- Create another GitHub branch named "version-2".
- Use the website or EAS CLI to point the "staging" channel at the EAS Update branch "version-2".
- Merge commits into the "version-2" branch until the new features and fixes are ready and stable.
- Use the website or EAS CLI to point the "production-rtv-1" channel at the EAS Update branch "version-2". This will mean that everyone with a production build (users who downloaded the app from the app stores) will now get the latest update on the "version-2" branch.
- A new release requires a new runtime version (for example, when new native libraries are added or SDK version is upgraded):
- Bump your runtime version from "1" to "2".
- Create a new "staging" build with the new runtime version.
- Create another GitHub branch named "version-2".
- Use the website or EAS CLI to point the "staging" channel at the EAS Update branch "version-2".
- Merge commits into the "version-2" branch until the new features and fixes are ready and stable.
- Create a new build with channel named "production-rtv-2", which will eventually get reviewed and become available on app stores.
- Use the website or EAS CLI to point the "production-rtv-2" channel at the EAS Update branch "version-2". This will mean that everyone who previously had a production build (users who downloaded the app from the app stores) will continue to get the latest update on EAS Update branch "version-1" until they download the new version of the app from the app store, at which time they will get the latest update on EAS Update branch "version-2".
- A new release does not require a new runtime version:
Advantages of this flow
- This flow is safer than the other flows. All updates are tested on test builds which are distributed to internal testers, and branches are moved between channels, so the exact artifact tested is the one deployed to production builds.
- This flow creates a direct mapping between GitHub branches and EAS Update branches. It also creates a mapping between GitHub commits and EAS Update updates. If you're keeping track of GitHub branches, you can create EAS Update branches for each GitHub branch and link those branches to a build's channel. In practice, this makes it so you can push to GitHub, then select the same branch name on Expo to link to builds.
- Previous versions of your deployments are always preserved on GitHub. Once the "version-1.0" branch is deployed, then another version is deployed after it (like "version-1.1"), the "version-1.0" branch is forever preserved, making it easy to checkout a previous version of your project.
Disadvantages of this flow
- One channel per production runtime version is needed to maintain historical updates for previous production releases. This makes using a runtime version policy more difficult.
- Bookkeeping of branch names is required for this flow, which will mean communicating with your team which branches are currently pointed at your test builds and your production builds.